

To spot proper microfoam, look for a glossy, velvety surface that feels smooth and stable. Avoid foam that looks stringy, separates, or lacks shine, as these signs show overheating or poor steaming. Keep the milk at a consistent temperature and pour slowly to maintain the right texture. Paying attention to these visual cues helps improve your latte art, and if you continue exploring, you’ll discover more tips to perfect your technique.
Key Takeaways
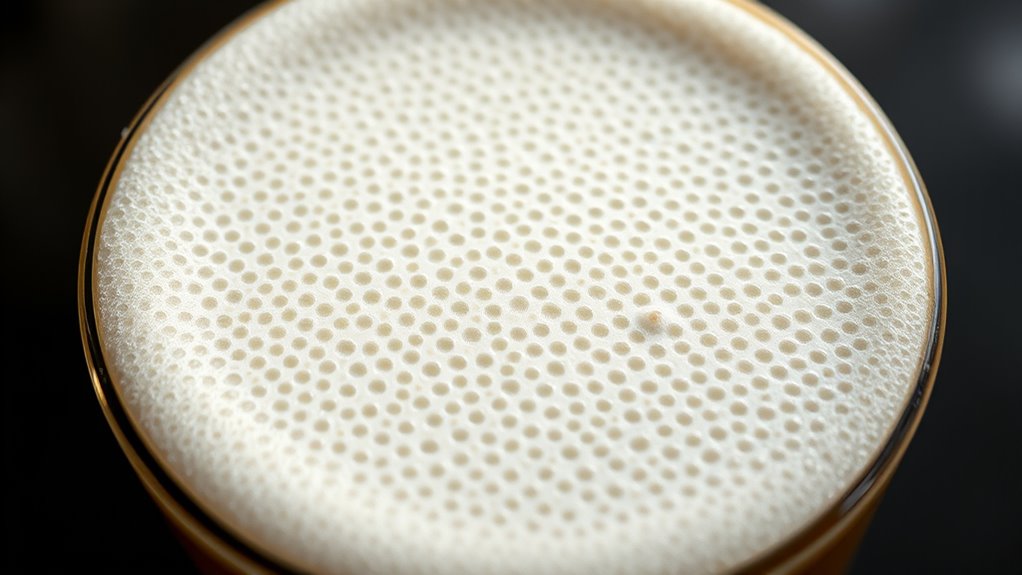
- Look for a glossy, paint-like shine on the milk’s surface as a sign of proper microfoam.
- Velvety, uniform microfoam indicates good integration and stable texture; separation or stringiness signals issues.
- Overheated milk causes foam to become thin, stringy, and lose its glossy appearance.
- Inconsistent microfoam during pouring suggests improper steaming temperature or technique.
- Pouring too quickly or from too high can create uneven patterns and disrupt microfoam formation.
Microfoam texture refers to the tiny, velvety bubbles that create a smooth, creamy layer on top of your espresso or latte. Achieving this perfect microfoam is essential for both the aesthetic appeal and the overall taste experience. When you master microfoam, you unlock the ability to create beautiful latte art, which involves precise techniques to manipulate the foam into intricate patterns. To do this successfully, you need to pay close attention to latte art techniques, which include pouring techniques, the angle of your pitcher, and the flow rate. But before you even start pouring, controlling the microfoam temperature is vital. If the milk is too hot, the bubbles can collapse, resulting in a thin, stringy foam that’s difficult to work with. Too cold, and the milk won’t expand properly, leading to stiff foam that doesn’t blend smoothly into your espresso. The ideal microfoam temperature sits around 140°F to 150°F (60°C to 65°C). Using a thermometer helps maintain this range, ensuring the foam stays velvety and stable.
Your milk steaming process plays a critical role in creating the right microfoam texture. When steaming, you want to introduce air gradually and then focus on heating the milk evenly. Proper microfoam temperature control involves listening for a consistent hissing sound and watching the milk’s surface for a glossy, paint-like shine. As you steam, keep the pitcher at a slight angle and position the steam wand just below the surface to incorporate air slowly, creating those tiny bubbles. Once the milk reaches the right temperature, immediately turn off the steam to prevent overheating, which can ruin the microfoam’s texture. Additionally, understanding the texture of microfoam helps in achieving better latte art results by visualizing the microfoam’s appearance during the pouring process.
When pouring the milk, your technique will determine the final visual cues of your latte art. A common mistake is pouring too quickly or with too much height, which can cause the microfoam to break and result in a streaky or uneven pattern. Instead, pour steadily with a controlled flow, starting from higher above the cup to integrate the foam smoothly, then lowering the pitcher close to the surface to manipulate the foam into your desired shape. Watching the microfoam’s consistency during pouring helps you gauge whether your microfoam temperature control and steaming technique are effective. If you notice the foam separating or turning stringy, it’s likely too hot or not well-integrated. With practice, you’ll recognize these visual cues and refine your process for a perfectly textured microfoam that’s ideal for both latte art and a creamy, rich coffee experience.
Breville Barista Express Espresso Machine BES870XL, Brushed Stainless Steel
The Breville Barista Express delivers third wave specialty coffee at home using the 4 keys formula and is...
As an affiliate, we earn on qualifying purchases.
Frequently Asked Questions
What Tools Are Best for Creating Microfoam?
You should use a steam wand on a quality espresso machine to create microfoam for latte art and guarantee foam stability. A small, narrow tip allows better control, helping you achieve smooth, shiny microfoam. Using a thermometer helps maintain ideal temperature. Proper steaming technique, combined with these tools, produces the perfect microfoam texture, giving your latte art sharpness and stability. This way, your foam’s consistency stays perfect for pouring.
How Does Milk Type Affect Microfoam Quality?
You’ll find that milk type greatly impacts microfoam quality. Whole milk, with its higher fat and protein content, creates richer, creamier foam that’s easier to texture smoothly. Skim milk has less fat, producing lighter, more airy microfoam, but it’s harder to achieve that velvety feel. Understanding how milk fat and protein influence foam helps you select the right milk to get the perfect microfoam every time.
Can Microfoam Be Achieved With Non-Dairy Alternatives?
Yes, you can achieve microfoam with dairy alternatives. However, the quality depends on the type you choose; some, like soy or oat milk, foam well, while others may struggle with foam stability. To get the best microfoam, heat the milk properly and use a steam wand or frother. Keep in mind that dairy alternatives often require more attention to foam stability and technique to produce smooth, velvety microfoam.
How Long Should the Steam Wand Be Used?
Imagine you’re steaming milk for a latte; you should use the steam wand for about 20-30 seconds. The ideal steaming time depends on your milk’s volume and type, but generally, 20-30 seconds is enough to create smooth, velvety microfoam. Keep an eye on the temperature—stop when the milk reaches around 150°F (65°C). Over-steaming can cause undesirable bubbles or burnt milk, so monitor closely.
What Are Common Signs of Over- or Under-Steaming?
When over-steaming, you notice large, frothy bubbles and a dry, grainy texture, indicating you’ve gone too far. Under-steaming shows thin, runny milk with little foam, meaning you haven’t heated enough. To avoid these issues, master milk frothing techniques and maintain your steam wand properly, ensuring consistent steam pressure. Regularly check for clogs or buildup, which can affect microfoam quality and help you achieve perfect, silky milk every time.

CASABREWS 5418 PRO Espresso Machine 20 Bar, Upgraded Espresso Maker with Powerful Steam Milk Frother, Stainless Steel Coffee Machine with Fast Heating System for Cappuccino, Latte, Silver
Espresso Machine with Flashheat Technology: CASABREWS 5418 PRO espresso maker delivers professional-grade speed for enthusiasts. Its innovative heating...
As an affiliate, we earn on qualifying purchases.
Conclusion
Now that you’ve unveiled the secrets of microfoam texture, you’re on the verge of transforming your coffee game entirely. With every swirl and tip, you’ll master a silky, velvety foam that could make even the most hardened barista bow in awe. Don’t settle for anything less than perfection—your latte art will become legendary, and your mornings will never be the same. Embrace the cues, dodge the mistakes, and watch your microfoam elevate you to coffee greatness!

Electactic Espresso Machine 20 Bar, Super Compact Espresso Maker Stainless Steel with Touch Screen, Professional Coffee Machine, Automatic Milk Frother for Cappuccino
𝐖𝐡𝐲 𝐂𝐡𝐨𝐨𝐬𝐞 𝐎𝐮𝐫 𝐄𝐬𝐩𝐫𝐞𝐬𝐬𝐨 𝐌𝐚𝐜𝐡𝐢𝐧𝐞? Our advanced Thermo Block Heating System ensures your machine is ready to brew...
As an affiliate, we earn on qualifying purchases.

ANYCOLD Espresso Machine 20 Bar, Compact Espresso Maker, Stainless Steel Expresso Coffee Machines with Steam Milk Frother & 34oz Removable Water Tank for Cappuccino, Latte, Home Office Use, Silver
Professional 20 Bar Pump: A 20-bar pressure system and 1450W motor deliver a stable 9-10 bar extraction pressure—the...
As an affiliate, we earn on qualifying purchases.