Use this guide to choose and set up coffee brewing accessories, then use them to make a repeatable cup at home. It is for beginners who already have a coffee maker or manual brewer and want to improve control over grind size, water, and brewing. Allow about 15-30 minutes for setup and a first brew.
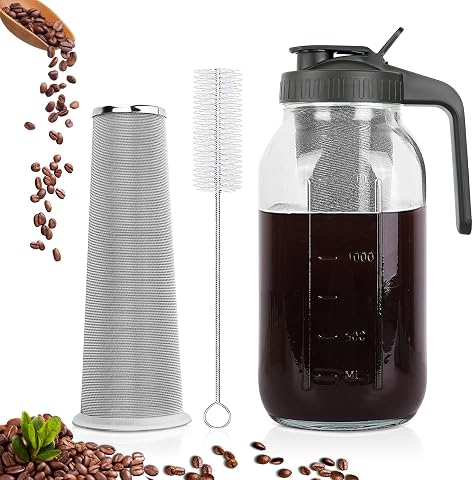
64 oz Mason Jar Cold Brew Coffee Maker with Stainless Steel Filter
- ✔ Capacity: 64 oz
- ✔ Pitcher material: Food-grade soda-lime glass
- ✔ Lid material: BPA-free plastic with silicone seal
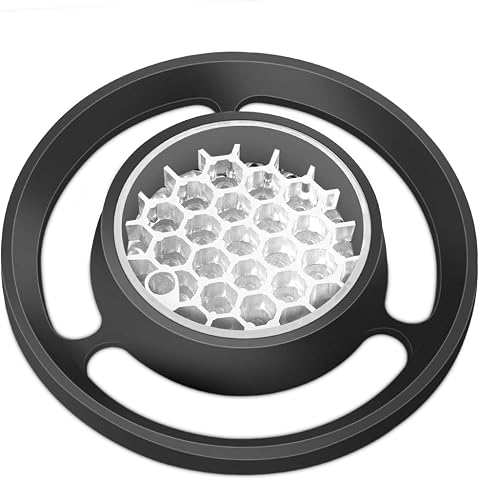
CAFEMASY Pour-Over Coffee Drip Assist for V60 and Cone Drippers
- ✔ Brand: CAFEMASY
- ✔ Material: PP and acrylic
- ✔ Pieces: 1

Cold Brew Coffee Filter Bags, 120 Count, 4 x 6 Inch
- ✔ Quantity: 120 bags
- ✔ Size: 4 x 6 inches
- ✔ Material: Food-grade, odorless non-woven fabric
Difficulty: Beginner | Time: 15-30 minutes
What You’ll Need
Tools & Materials:
- A coffee brewer, such as a drip machine, French press, or pour-over dripper
- Fresh coffee beans or ground coffee
- A burr grinder if using whole beans
- A digital scale that measures grams
- A kettle, preferably with temperature control for manual brewing
- Filters that fit your brewer, if required
- A timer, such as a phone timer
- A mug or serving carafe
Knowledge:
- Basic familiarity with your chosen brewer
- Ability to follow its instructions for filling and assembly
Use accessories that match your brewer. Check its manual for filter size, safe water capacity, and cleaning directions. Start with a simple setup: a scale and grinder usually offer more control than buying several specialized tools at once.
64 oz Mason Jar Cold Brew Coffee Maker with Stainless Steel Filter
For readers who make cold brew by steeping grounds in the refrigerator, this is the most complete accessory in the lineup. Its 64 oz glass pitcher, 304 stainless steel filter, sealed pour-spout lid, and cleaning brush bring the main steps into one setup. Compared with the filter bags, it avoids buying a disposable insert for each batch and gives us a vessel designed for serving as well as brewing. The 160-micron filter is intended to keep grounds out of the drink, while the wide mouth makes filling and washing more accessible.That completeness comes with care requirements. The soda-lime glass is not for boiling water and should not experience sudden temperature changes; the stated maximum safe operating temperature is 140°F. It is also a dedicated pitcher that takes more storage room than a bag tucked into a drawer. The bags make more sense for occasional brewing in a jar we already own, while this pitcher is the stronger choice for repeat batches and larger volumes. It can also hold iced tea or lemonade, though those extra uses do not remove the need to handle the glass carefully.
Pros:
- Large 64 oz capacity supports batch preparation.
- Reusable 304 stainless steel filter is included.
- Sealed pour-spout lid helps contain odors and spills.
- Wide mouth and dishwasher-safe parts simplify routine cleaning.
Cons:
- Glass must not be exposed to boiling water or sudden temperature changes.
- The pitcher occupies more storage space than disposable bags.
- The 140°F operating limit restricts hot-water use.
Best for: Cold brew drinkers who regularly prepare larger batches and want a reusable filter and serving pitcher together.
Not ideal for: People short on refrigerator or cabinet space, or anyone who needs a vessel that can handle hot water or abrupt temperature changes.
Bottom line: We recommend this pitcher for repeat cold brew batches when capacity and an all-in-one reusable setup matter most.
“We recommend this pitcher for repeat cold brew batches when capacity and an all-in-one reusable setup matter most.”
CAFEMASY Pour-Over Coffee Drip Assist for V60 and Cone Drippers
When our challenge is uneven pouring rather than cold brew cleanup, the CAFEMASY tool has the clearest specialized role. Its steady-flow holes and spiral ridge are designed to distribute water over coffee in a V60 or compatible cone dripper. That gives pour-over brewers an accessory aimed at making water delivery more controlled without replacing their existing dripper. The pitcher and bags cannot do that job: both are built for steeping, not directing a hand pour through a coffee bed.Its usefulness hinges on the dripper we already own. Compatibility is specified for #1 and #2 V60 and #2 cone drippers, so we should check the size before buying rather than assume a universal fit. It is also a modest intervention: it helps manage water flow, but does not automate the brew or eliminate the need for a grinder, filter, and careful setup. Removable components and smooth surfaces help with cleaning, though the stated care is to rinse and dry after use. This makes more sense for a pour-over routine than for anyone primarily looking to prepare cold brew.
Pros:
- Designed to help distribute water more evenly.
- Steady-flow holes support controlled water delivery.
- Removable parts make access for rinsing easier.
- Works with listed V60 and cone dripper sizes.
Cons:
- Compatibility is limited to specified dripper sizes.
- Requires rinsing and drying after each use.
- Does not replace the dripper, filter, or other pour-over equipment.
Best for: Manual pour-over brewers with a specified V60 or cone dripper who want help distributing water steadily.
Not ideal for: Cold brew makers, owners of drippers outside the listed sizes, or buyers seeking a complete brewing setup.
Bottom line: We would choose this drip assist when our pour-over dripper is compatible and steadier water flow is the specific improvement we want.
“We would choose this drip assist when our pour-over dripper is compatible and steadier water flow is the specific improvement we want.”
Cold Brew Coffee Filter Bags, 120 Count, 4 x 6 Inch
These bags are the leanest cold brew solution in the group: add grounds, pull the drawstring closed, and steep in a compatible container. Their fine-mesh, food-grade non-woven fabric is intended to keep grounds contained and reduce gritty residue, while the tear-resistant construction is suited to a long steep. Compared with the 64 oz pitcher, the bags do not provide a brewing vessel or a reusable metal filter, but they take little storage space and can be used with a compatible 32 oz mason jar. A 120-count pack also gives frequent users a ready supply.The main compromise is built into the convenience: these are disposable bags, so brewing repeatedly means discarding and replacing them. That creates more ongoing consumable use than the pitcher’s washable stainless steel filter. They are also less versatile for serving; the jar remains a separate item, and buyers should make sure the 4 x 6 inch size suits their container and batch. Their stated additional uses—tea, herbs, and soup infusions—make them more flexible around the kitchen than the drip assist, but they remain the wrong pick for someone seeking controlled pour-over water flow.
Pros:
- Fine mesh helps contain grounds and reduce gritty residue.
- Drawstring closure makes filling and removal straightforward.
- Tear-resistant material is suited to long steeping.
- Can also be used for tea, herbs, and soup infusions.
Cons:
- Disposable design requires replacing bags after use.
- A compatible container must be supplied separately.
- The listed 4 x 6 inch size may not suit every jar or batch.
Best for: Occasional or regular cold brew makers who already have a compatible mason jar and want easy grounds containment.
Not ideal for: People who prefer reusable filters, want a pitcher included, or are shopping for a pour-over accessory.
Bottom line: We recommend these bags when easy cleanup and low storage needs outweigh the recurring use of disposable filters.
“We recommend these bags when easy cleanup and low storage needs outweigh the recurring use of disposable filters.”
As an Amazon Associate we earn from qualifying purchases.
Before You Start
Set out your brewer, accessories, coffee, and water before heating the kettle. Use clean, fresh-tasting water and a stable, dry surface. Keep hot water away from the edge of the counter, and handle the kettle by its handle. If you are unsure how much coffee or water to use, start with 15 grams of coffee per 250 grams of water, then adjust to taste.
Step-by-Step Instructions
Step 1: Choose accessories for your brewer
Match each accessory to the brewing method you use. Select the correct paper or reusable filter, a scale with enough capacity for your brewer and carafe, and a grinder if you buy whole beans. For pour-over brewing, a gooseneck kettle can make water flow easier to control. For French press or drip coffee, a standard kettle is usually adequate.
Tip: Do not buy a filter based only on appearance. Confirm its size and shape against the brewer or its manual.
Check: The filter fits without folding or blocking the brewer, and the scale can hold your brewing vessel and water.
Step 2: Prepare the brewer and filter
Place the brewer on a level surface and set the mug or carafe below it. Insert the filter. If you use a paper filter for pour-over, rinse it with hot water to reduce papery taste and warm the brewer; discard the rinse water before adding coffee. Follow the brewer maker’s instructions if it specifies a different preparation.
Tip: Take care when disposing of hot rinse water. Keep the carafe positioned so it catches the brewed coffee.
Check: The filter is seated, the vessel is empty, and the brewer is stable and ready to receive coffee.
Step 3: Measure the coffee and water
Place the empty brewing vessel or brewer on the scale and tare it to zero. Add coffee by weight. For a starting ratio, measure 15 grams of coffee for every 250 grams of water; scale both amounts up together for a larger brew. Measure water separately if your brewer does not let you pour directly onto the scale.
Tip: A scale gives more repeatable results than scoops, because bean size and grind density vary.
Check: You have recorded the coffee and water amounts, so you can repeat or adjust the recipe after tasting.
Step 4: Grind the beans to suit the method
If using whole beans, weigh the beans and grind them just before brewing. Start with a medium grind for most drip machines and pour-over brewers, and a coarse grind for French press. Consult your grinder or brewer instructions if they specify a setting. Add the grounds to the filter or press pot and level them gently.
Tip: Avoid changing grind size, coffee dose, and water amount all at once. Adjust one variable per brew so you can tell what changed the flavor.
Check: The grounds are distributed evenly, and the dose matches the amount you measured.
Step 5: Heat and measure the water
Heat fresh water using the kettle or brewer. For manual brewing, water just off the boil is a useful starting point if your kettle has no temperature control. Use the scale to track the water poured when practical. Follow the appliance manual for safe fill levels and operating instructions.
Tip: Do not fill a kettle above its maximum line. Allow recently boiled water to settle briefly before pouring if it splashes or agitates the grounds too strongly.
Check: You have enough hot water for the measured recipe, and it is ready to pour safely.
Step 6: Brew and time the coffee
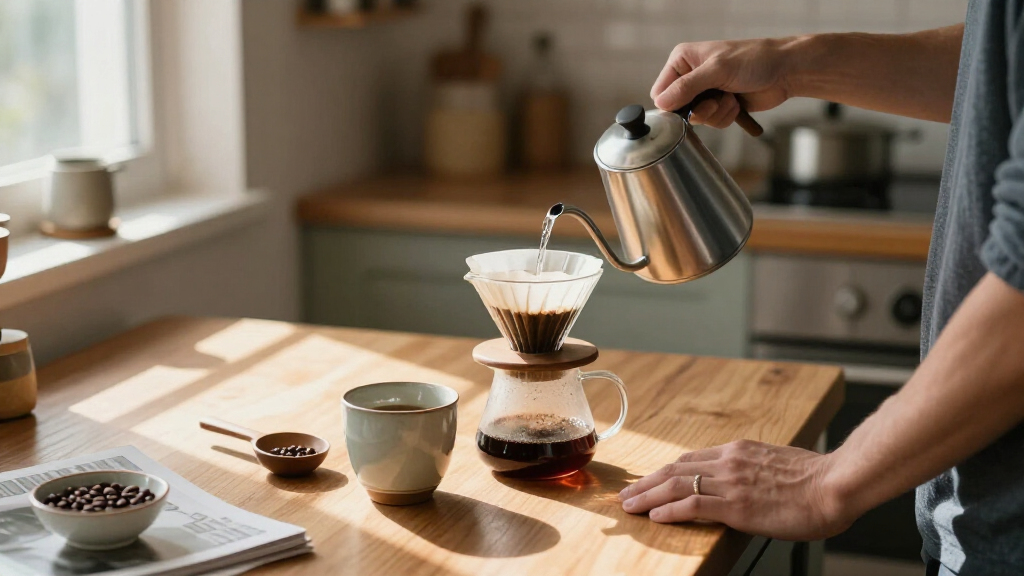
Start the timer when water first contacts the grounds. For pour-over, wet the grounds evenly with a small amount of water, wait about 30 seconds, then pour in slow, controlled additions until you reach the target water weight. For French press or automatic brewers, follow the brewer’s normal filling and steeping instructions. Keep the total recipe and method consistent for the first tasting.
Tip: Pour gently and avoid overflowing the filter. Do not leave brewed coffee sitting on grounds longer than the brewer calls for, as it can become bitter.
Check: The brew finished without spills, and you can compare its time and amounts with your next attempt.
Step 7: Taste, adjust, and clean the accessories
Taste the coffee once it is cool enough to sip. If it tastes weak or sour, try a slightly finer grind or a little more coffee next time. If it tastes harsh or bitter, try a coarser grind or a shorter brew. Change only one thing at a time. Empty the grounds, discard the filter, and wash or rinse accessories as their care instructions allow; dry them before storage.
Tip: Keep grinders dry unless their instructions permit washing removable parts. Coffee residue and moisture can affect later brews.
Check: You have a clear adjustment in mind for the next cup, and the accessories are clean and stored dry.
Common Mistakes to Avoid
- Using a filter that does not fit the brewer. — Check the brewer model or manual for the filter type and size before buying or brewing.
- Measuring coffee with scoops and changing the dose from cup to cup. — Weigh the coffee and water in grams, and note the ratio that tastes good.
- Grinding too fine or too coarse for the brewing method. — Begin with a method-appropriate grind and adjust gradually after tasting.
- Pouring too quickly or beyond the filter’s capacity. — Use controlled pours and pause if the water approaches the top of the filter.
Troubleshooting
Problem: Coffee tastes weak or watery.
Solution: Check that you used the intended coffee dose and water amount. For the next brew, use slightly more coffee or grind a little finer while keeping the water amount fixed.
Problem: Coffee tastes bitter, harsh, or dry.
Solution: Try a coarser grind or reduce the brewing time. Check that the water did not overflow or remain in contact with the grounds longer than your brewer’s directions.
Problem: Water drains very slowly through a pour-over filter.
Solution: Use a coarser grind, pour more gently, and check that the filter is seated and not clogged. Avoid stirring or compacting the grounds.
Problem: The filter collapses, leaks, or lets grounds into the cup.
Solution: Confirm that the filter is the correct type and seated evenly. Replace damaged paper filters, and check that reusable filters are clean and correctly assembled.
What Success Looks Like
Your brewer completes a full cup without leaking or overflowing, and the coffee tastes balanced enough for you to enjoy. You can repeat the recipe because you recorded the coffee dose, water amount, grind setting, and approximate brew time. If the taste needs work, you know which single adjustment to try next.
Next Steps
Write down the recipe and your tasting notes near your coffee setup. Repeat it once before making another adjustment. Clean the brewer and grinder as their manuals recommend, and replace paper filters or worn parts when needed. Add a specialized accessory only when it addresses a specific problem, such as needing a more controlled pour or a steadier brewing temperature.
Frequently Asked Questions
Which coffee accessory should I buy first?
A digital scale is a practical first choice because it helps you repeat the coffee-to-water ratio. If you use pre-ground coffee and already measure consistently, focus on a filter that fits your brewer and clean water instead.
Do I need a gooseneck kettle?
No. A gooseneck kettle can make it easier to control a pour-over stream, but it is optional. A standard kettle works for French press and many drip setups.
Is a burr grinder necessary?
No, but a burr grinder can produce more even grounds and let you adjust the grind. You can still brew with good-quality pre-ground coffee; store it sealed and use it while fresh.
How do I know whether to grind finer or coarser?
Use taste as your guide. A brew that tastes weak or sour may benefit from a finer grind, while a harsh or bitter cup may improve with a coarser grind or shorter brew. Change one factor at a time.
How often should I clean coffee accessories?
Rinse or wash brewing parts after each use according to their care instructions. Remove coffee oils and residue from the brewer and grinder regularly; buildup can affect flavor.