
TL;DR
Moving your rig into a closet or separate space offers the best noise reduction. Proper placement, ventilation, and targeted dampening make a closet setup effective for both soundproofing and acoustic treatment, especially for vocal and streaming work. For more detailed strategies, see this guide on acoustic dampening.
Imagine a tiny closet turned into your secret recording hideout. You’ve got the mic, the gear, but the space still echoes or leaks noise. The secret isn’t just fancy foam — it’s smart placement and understanding how sound moves. This guide shreds the myth that foam alone can silence a room and shows you how to make your closet both quiet and acoustically friendly.
Whether you’re podcasting, streaming, or just trying to tame that high-pitched PC whine, where and how you set up matters more than you think. You’ll learn how to dampen reflections, block the sound from escaping, and keep your rig cool — all with practical steps, real-world examples, and insider tips.
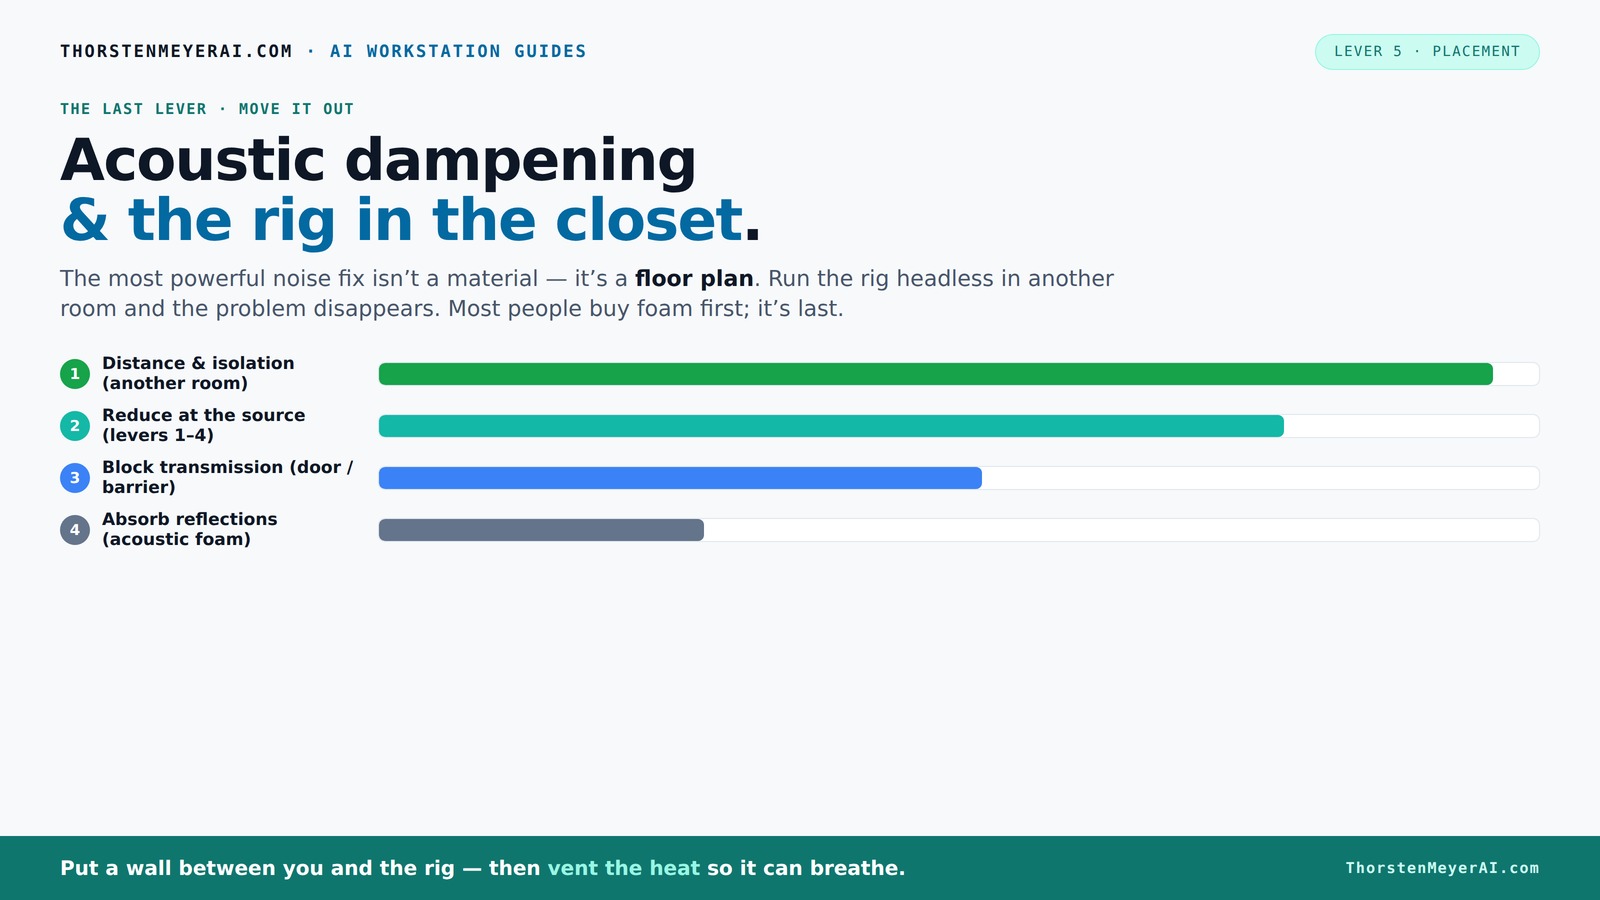
Acoustic dampening
& the rig in the closet.
The most powerful noise fix isn’t a material — it’s a floor plan. A rig you can’t hear because it’s in another room beats any amount of foam. Tap the approaches in Part 1 to see what actually works.
(another room)
(levers 1–4)
(door / barrier)
(acoustic foam)
Contain the noise, not the heat
Key Takeaways
- Moving your rig into a separate room or closet dramatically reduces noise transmission and is the most effective strategy.
- Acoustic foam absorbs reflections but doesn’t block sound; sealing gaps and adding mass are essential for true soundproofing.
- Placement of absorption materials should focus on first reflection points and corners; overusing foam can deaden the room unnaturally.
- Proper ventilation is critical in enclosed spaces — a quiet exhaust system prevents heat buildup and component damage.
- A closet rig is ideal for controlling echo and reflections for vocals and streaming, but it won’t eliminate all external noise.

'Snap Studio' The Original Vocal Booth, Pro Sound Blankets, Portable Studio-Grade Recording, Sound Isolation, Trusted Globally By Professional Artists, Musicians, VO, Podcasters
- Top-Rated Portable Recording Booth: Featured by Rolling Stone as best sound booth
- Superior Sound Quality: Uses heavy-duty pro sound insulation blankets
- Professional Recording Kit: Includes sound-absorbing blankets, lighting, holder, and storage
As an affiliate, we earn on qualifying purchases.
As an affiliate, we earn on qualifying purchases.
Why Soundproofing a Closet Isn’t Just Slapping Foam on the Walls
Many people assume that sticking foam panels in a closet turns it into a soundproof booth. The truth? Foam absorbs echoes and flutter, but it does little to stop noise from leaking outside. Real soundproofing is about sealing gaps, adding mass, and blocking pathways for sound to escape.
For example, sealing the closet door with weatherstripping and adding a heavy blanket over gaps can cut noise transmission by 50%. Foam reduces echo, making recordings clearer, but it’s not a barrier. Think of foam as softening the room, not locking it down.
Understanding this tradeoff is crucial: if you want to prevent external noise from entering, you need to focus on sealing and mass addition. If your goal is to improve internal acoustics, foam is helpful but not enough on its own. Recognizing this distinction helps you allocate your resources effectively and avoid false expectations about what foam can accomplish in soundproofing.
The Best Placement Strategies for Your Closet Rig
Where you put your gear inside the closet is the key to both sound quality and thermal management. Position your microphone at the first reflection point — usually the wall directly behind or beside it. Use a mirror to find this spot: the point where your reflection bounces back to your mic.
Place absorbing panels or blankets on the wall behind the mic and on side walls that reflect sound. Keep the rig away from walls that are close or parallel, to prevent bass buildup and flutter echoes. For example, a mic stand placed 6-12 inches from the back wall with panels on either side dramatically improves vocal clarity.
Proper placement isn’t just about reducing echo; it’s about understanding how sound interacts with small spaces. Placing your mic too close to walls can cause proximity effect and bass booms, while positioning it too far away can introduce unwanted room noise. The ideal setup balances proximity for warmth and clarity with strategic absorption to prevent reflections. Moving your gear an inch or two can make a significant difference in the quality of your recordings, especially in confined spaces.
Remember, the goal isn’t just to sound good — it’s to control sound reflections, prevent sound from bouncing around, and reduce muddiness and echo. Thoughtful placement minimizes these issues, which are especially problematic in small, reflective environments like closets.
How to Use Acoustic Dampening Materials Effectively in a Small Closet
Picking the right materials makes or breaks your setup. For tips on acoustic treatment materials, visit this resource on acoustic dampening. Thicker panels (2-4 inches) absorb lower frequencies better, which is essential if your closet has parallel walls or low-frequency build-up that causes a boomy sound. In small spaces, these low-end resonances can muddy your recordings, making it hard to distinguish vocals from background rumble. For high frequencies, thinner foam or moving blankets work well, but they should be used in conjunction with bass traps to achieve a balanced sound.
Use a combination of materials: bass traps in the corners for low-end control, thick foam panels for mid and high frequencies, and rugs or carpets on the floor to reduce reflections and foot noise. For instance, covering 20-30% of the wall surface with absorption material is enough for a small closet to tame echo without making it sound dead or unnatural. The tradeoff here is between absorption and liveliness: too much absorption can make your space sound flat and dead, losing the sense of space and clarity. Conversely, too little leaves reflections that muddle your recordings. Finding the right balance ensures your recordings are clear, natural, and professional-sounding.
Don’t overdo it. Excessive foam, especially on the door or ceiling, can overly deaden the space, making vocals sound muffled and unnatural. Strategic placement and moderation are key to maintaining a balanced acoustic environment that enhances your sound without sacrificing naturalness.
Should You Seal or Vent Your Closet? The Ventilation Dilemma
Putting your rig in a sealed closet traps heat and can cook your components. The trick? Ventilation. Active airflow — like a quiet exhaust fan or duct system — is the solution. A small vent with a low-noise fan can keep air moving without adding noise. But the key is balancing effective cooling with noise control. If your ventilation system is too loud, it defeats the purpose of a quiet space.
For example, a 120mm fan running at low RPM can exhaust hot air while remaining under 20 dB—barely noticeable. If you need a super-quiet setup, consider a purpose-built soundproof cabinet with ducted airflow and temperature sensors, which automatically regulate cooling. These systems incorporate acoustic baffles or mufflers to minimize noise from airflow, ensuring your workspace remains quiet while staying cool.
Understanding the implications of ventilation is critical: insufficient airflow can lead to overheating, risking damage or reduced lifespan of your gear, while over-ventilation can introduce unwanted noise. The ideal solution involves a carefully designed duct system with noise dampening features, ensuring your setup remains both cool and quiet. Remember, neglecting proper ventilation can lead to thermal issues, so plan your airflow path thoughtfully.
Ultimately, the balance between soundproofing and ventilation requires careful consideration. Properly designed ducted systems or quiet fans are essential to maintain a safe operating environment without compromising your acoustic goals.
The 'Rig in the Closet' Setup — What It Can and Can’t Do
A closet rig can transform your noisy, cluttered workspace into a quiet sanctuary. It’s perfect for vocal recordings, streaming, or video calls. But don’t expect it to fully soundproof your apartment from outside noise or prevent footsteps and household sounds.
Sealing gaps around the door, adding thick curtains or blankets, and using absorption materials can significantly reduce internal echo and some external noise. However, because of the limited mass and the unavoidable small leaks, external sounds like street traffic, neighbors, or pets will still be audible. It’s important to understand these limitations to set realistic expectations. The closet setup excels at controlling reflections and isolating your microphone from room acoustics, but it isn’t a complete barrier against all external noise sources.
The real benefit? You get a controlled, dead-sounding space suitable for professional-quality recordings with minimal investment. Just remember: this is about managing internal reflections and microphone isolation, not total soundproofing. Recognizing these limitations helps you optimize your setup without overestimating its capabilities, ensuring you focus on what it can realistically achieve.
Practical Tips for a Perfect Closet Setup
- Start with a plan: identify the main noise issues — echo, external sound, heat.
- Use thick, porous absorption panels on the first reflection points.
- Seal gaps around the door with weatherstripping or draft stoppers.
- Place bass traps in corners if low-frequency buildup is noticeable.
- Ventilate with a quiet fan or duct system to prevent overheating.
- Use rugs or carpets on the floor to reduce footfall noise and reflections.
- Position the mic at the first reflection point, not directly against the wall.
Each step makes your closet a little more professional — not just quieter, but acoustically balanced and safe for your gear. Proper planning and execution ensure that your space is optimized for both sound quality and equipment longevity, avoiding common pitfalls like overheating or excessive deadening.
Frequently Asked Questions
Does acoustic foam actually soundproof a closet?
Acoustic foam absorbs reflections and reduces echo but doesn’t block external noise. True soundproofing requires sealing gaps, adding mass, and blocking sound pathways. Foam alone won't make your closet soundproof from outside noise.Where should I place acoustic panels in a closet studio?
Start with the first reflection points — the wall directly behind or beside your mic. Also, treat the ceiling and side walls to prevent flutter echoes. Corner bass traps help control low frequencies, especially in small spaces. Proper placement minimizes problematic reflections and resonances, which are critical for achieving clear recordings.Do I need bass traps in a small vocal booth?
Yes, especially if you notice low-frequency buildup or a boomy sound. In tiny closets, bass traps in the corners help tame these issues, creating a clearer, more balanced recording environment. Proper low-frequency control prevents muddiness and improves overall sound definition.How thick should the panels be for a closet recording setup?
Thicker panels (2-4 inches) absorb lower frequencies more effectively, which is vital in small spaces prone to bass buildup. Thinner panels (around 1 inch) are suitable for high frequencies. Combining different thicknesses based on your specific acoustic issues creates a balanced sound environment, avoiding overly dead or unnatural acoustics.What’s the biggest mistake in a rig-in-the-closet setup?
Over-relying on foam without sealing gaps or providing adequate ventilation. This oversight leads to persistent echo, heat buildup, and potential gear damage. Additionally, placing the mic directly against walls increases reflections and muddies your sound. Recognizing these pitfalls allows you to design a more effective, safe, and realistic setup.Conclusion
Think of your closet as a blank canvas — with smart placement, layered dampening, and proper ventilation, it can become your most professional-sounding, quiet workspace. The trick isn’t just in how much foam you use, but where you put it and how you manage airflow. Your best move? Embrace the layered approach: treat reflections, block leaks, and keep your gear cool.
With a little effort, you can have a tiny studio where your voice sounds crisp, your gear stays cool, and noise stays outside. Ready to turn that closet into your secret studio?